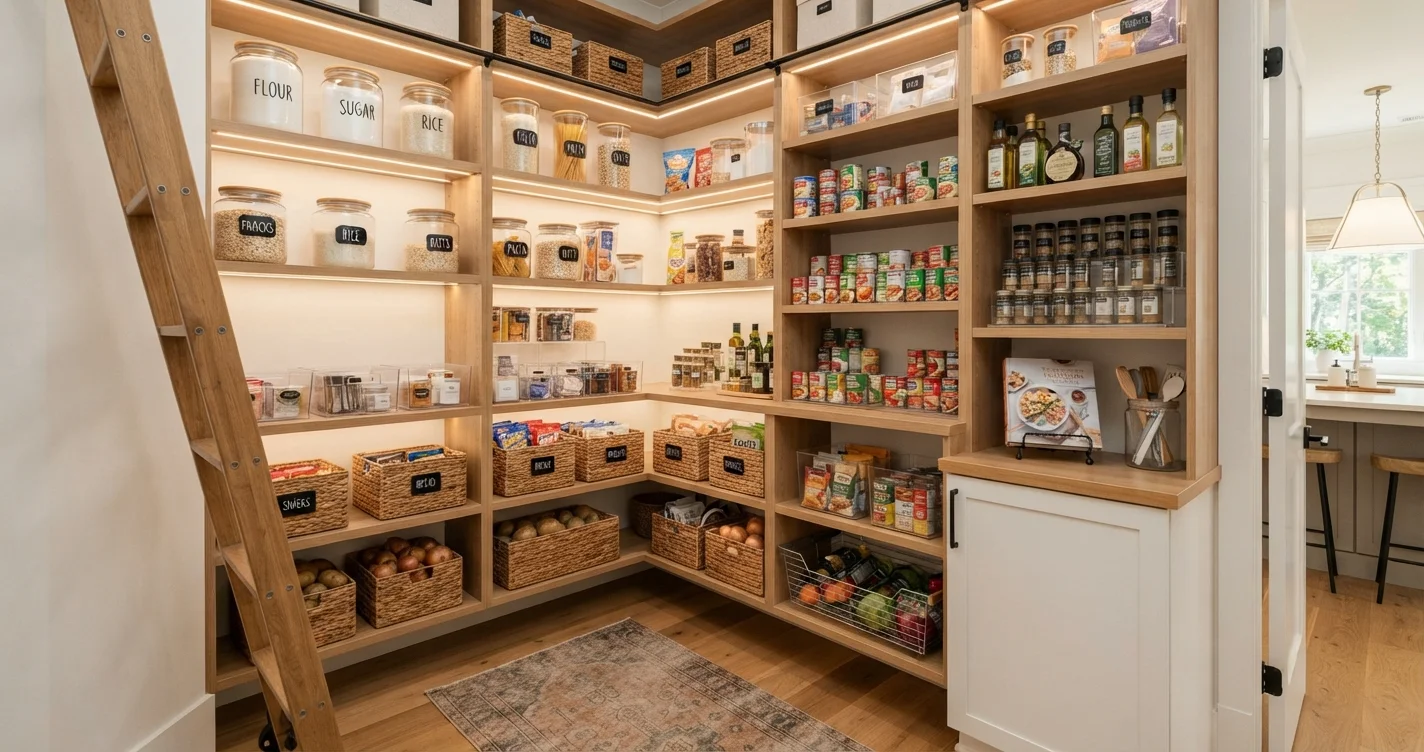
Your pantry might be one of the hardest-working rooms in your home, yet it often ends up as the dumping ground for expired canned goods and half-empty chip bags. If you have to move three jars of pasta sauce to grab a spice behind them, something needs to change. A thoughtful pantry layout for maximum storage and visibility transforms chaos into calm. And the good news? You don’t need a massive walk-in to get it right. Let’s break down exactly how to design a system that saves you time, money, and dinner-prep headaches.
1. Assess Your Pantry Shape and Size
Before you buy a single bin, understand your architectural canvas. Is your pantry a narrow reach-in closet, a deep walk-in, or a shallow set of cabinets? Measure every dimension: width, depth, and height from floor to ceiling. Pay attention to obstructions like light switches, outlets, and vents. These details will determine whether you can stack shelves to the ceiling or need to keep lower areas accessible for heavier items.
Take a photo and sketch a rough floor plan. This step is critical because walk-in pantry shelving layouts differ completely from reach-in designs. A reach-in works best with adjustable shelves and door-mounted racks. A walk-in benefits from perimeter shelving with a central island or cart. Knowing your shape prevents buying storage that doesn’t fit.
2. Create Functional Zones
Zoning is the secret to pantry organization ideas that actually stick. Divide your space into activity-based areas: everyday cooking needs, bulk storage, snacks, and small appliances. For example, group baking supplies together: flour, sugar, baking powder, vanilla, and chocolate chips. Keep them near the mixer and measuring cups. Place daily-use items like oil, salt, and spices at eye level.
Your zones should follow natural routines. When you cook taco night, you should be able to grab canned beans, seasoning, tortillas, and rice from one vertical zone. Keep off-season or rarely used items (roasting pans, holiday platters) on high shelves or low bins. A well-zoned pantry makes grocery restocking intuitive and meal prep faster.
3. Optimize Shelf Heights and Depths
Fixed shelves are a designer’s mistake. Use adjustable shelf brackets to customize spacing for your actual belongings. Canned goods and small jars need about 6–8 inches of vertical space; cereal boxes and bottles need 10–12 inches; tall items like olive oil or vinegar carafes need 14–16 inches. Avoid the trap of making all shelves the same height—you’ll waste precious vertical inches.
For depth, keep shelves at a maximum of 12–14 inches deep in standard cabinets. Deeper than that, items get lost in the back. In a walk-in pantry, you can use a mix of shallow shelves (10 inches deep) on the sides and deeper shelves (16 inches) for bulk containers on the back wall. This hybrid approach ensures you can see everything at a glance, which is the core of a pantry layout for maximum storage and visibility.
4. Use Clear Containers and Label Everything
Visibility doesn’t come from clairvoyance; it comes from transparency. Transfer dry goods like flour, sugar, pasta, and cereal into airtight clear pantry containers. This single change eliminates the mystery of “is that all-purpose or self-rising flour?” Stackable square containers use space more efficiently than round ones. For bulk items like rice and beans, large 5-liter bins with wide mouths work well.
Labels are non-negotiable. Use a label maker or chalkboard stickers and write the contents plus the expiration date. This practice supports food storage rotation—first in, first out. When you decant a bag of almonds, mark the date. When you buy a new bag, put it behind the older container. This method reduces food waste dramatically.
| Container Type | Best For | Estimated Shelf Life Improvement |
|---|---|---|
| Airtight glass jars | Spices, herbs, small grains | Up to 3x longer |
| Clear plastic bins (square) | Pasta, cereal, crackers | Up to 2x longer |
| Large BPA-free canisters | Flour, sugar, rice | Up to 4x longer |
5. Maximize Vertical Space with Risers and Door Racks
Once your shelves are set, think up. Canned goods and spice jars are notorious for hiding behind each other. Use step risers (like mini staircases) to elevate back rows. You can find tiered risers for cans or DIY them with wooden strips. For spices, install a narrow magnetic strip on the inside of the door or a small spice rack that attaches to the shelf above.
Don’t ignore the back of the door. Over-door racks hold foil, plastic wrap, pantry bags, and lightweight snacks. Just check that the door can still close flush. For deeper walk-in pantries, use the wall space between shelves for hanging hooks for aprons or reusable shopping bags. Vertical surfaces are gold in any kitchen storage solutions plan.
If your pantry is part of a larger remodel, consider the flow with other kitchen areas. For instance, many homeowners pair a well-organized pantry with a dedicated space-planning strategy that also improves countertop efficiency.
6. Implement the “One-Touch” Rule for Bins and Baskets
Lazy Susans and pull-out bins are not just for decorating shows—they genuinely improve access. For corner cabinets or deep pantry shelves, a large Lazy Susan rotates everything into reach with one spin. Use it for oils, vinegars, and condiments. For lower shelves, use wire pull-out baskets. They slide forward so you don’t have to kneel and fish for things.
The “one-touch” rule means you should never have to move Item A to reach Item B. If you do, the layout needs adjustment. Place similar items in baskets: one basket for breakfast items (oatmeal, granola, tea bags), another for canned vegetables. This grouping keeps the pantry tidy and speeds up both cooking and grocery lists. Trust me, after you try this, you’ll wonder why you ever tolerated digging.
7. Maintain with a Weekly Five-Minute Reset
Even the best layout will degrade without maintenance. Schedule two things: a weekly five-minute tidy and a monthly deep rotate. The weekly tidy is simple: walk the pantry, pull forward any items that drifted back, wipe up crumbs, and check for expired items. Do this while your coffee brews. The monthly deep rotate involves pulling out every dry good, checking dates, and reorganizing by your zones.
This habit also reveals if your pantry organization ideas need tweaking. Maybe you put granola bars too high and kids can’t reach them, or your baking zone needs more space during the holidays. Adjust freely. The best systems evolve with your cooking habits. For more general home organization inspiration, you can browse our practical home articles.
If you’re planning a more extensive home renovation, check out resources on smart home design concepts to integrate your pantry seamlessly into the overall floor plan.
Frequently Asked Questions
What is the best width for pantry shelves?
Shelf width should not exceed 36 inches (about 90 cm) without a center support, or the board may sag under heavy jars. For wire shelving, 36 inches is also the standard safe span. If your pantry is wider, install vertical dividers or use multiple shelves side by side.
How deep should pantry shelves be?
For reach-in pantries, 12 to 14 inches deep is ideal. For walk-in pantries, you can mix depths: 10 inches on the sides for jars and spices, and up to 18 inches on the main wall for bulk bins and small appliances. Deeper than 18 inches tends to create blind spots.
Should I use open shelving or cabinets in my pantry?
Open shelving is great for visibility and quick access. Cabinets hide clutter but reduce visibility. A hybrid approach works best: open shelves for everyday items and cabinet doors on lower sections to hide less attractive bulk bags or cleaning supplies. Many homeowners find that open shelving combined with innovative home storage solutions yields the most functional results.
How do I organize a small reach-in pantry?
Use every vertical inch. Stackable bins, over-door racks, and shelf risers are your best friends. Add a magnetic spice strip on the wall. Group like items tightly and use clear containers so you can see everything at a glance. Avoid baskets that hide items from view.
What containers are best for food storage in a pantry?
Square, clear, airtight containers are optimal because they stack neatly and allow you to see contents. Glass is excellent for longevity and doesn’t absorb odors, but plastic BPA-free containers are lighter and cheaper. Avoid round containers; they waste space in square shelf footprints.
How often should I deep clean my pantry?
Aim for a deep clean every three months. Remove everything, wipe shelves with warm soapy water, check all expiration dates, and reorganize according to your current cooking patterns. This is also a good time to vacuum crumbs from cracks and corners.
Can I use a pantry for non-food items?
Yes, but keep them in separate zones. Reserve the lower or higher shelves for small appliances, special dinnerware, or paper supplies. Avoid mixing cleaning chemicals with food items. A dedicated bin on a bottom shelf works well for extra dish soap and sponges.
Conclusion
A smart pantry layout is about more than just looking pretty—it’s about making your life easier every single day. By measuring your space, creating logical zones, using adjustable shelves, switching to clear containers, and implementing simple rotation habits, you transform a storage problem into a functional showpiece. Whether you’re wrestling with a tiny cupboard or designing a full walk-in, the principles stay the same: see everything, grab anything, waste nothing.
Start with one zone this weekend. Label three shelves. Move that ancient bag of lentils to the front. You’ll be amazed at how much time and money you save when you can actually see what you own. Now go rearrange that pantry—your future dinner self will thank you.