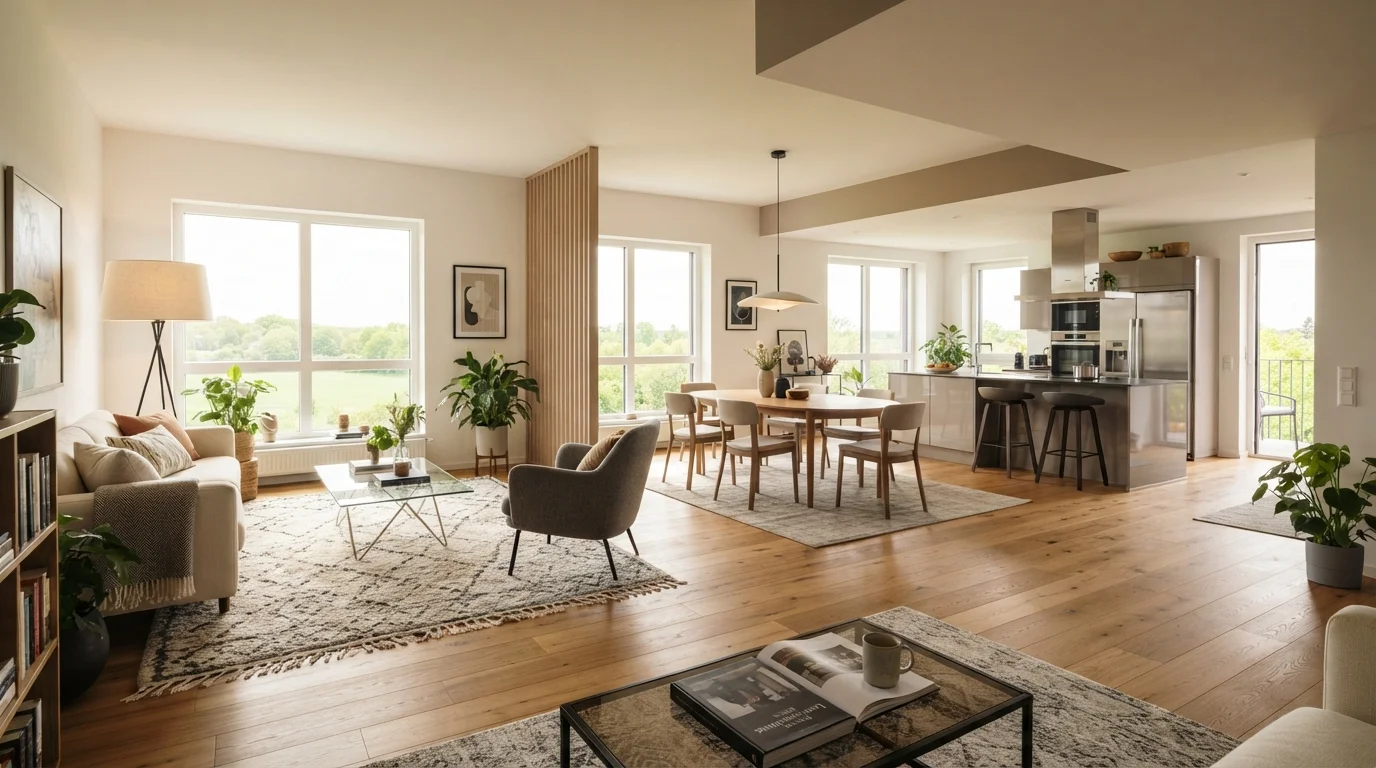
Open-concept living has a beautiful, airy appeal, but it often comes with one major headache: how do you create distinct zones without building walls? If you have a large great room that tries to be a living room, dining room, and kitchen all at once, you know the struggle. Furniture can feel like it’s floating, and the space can lose its purpose. That’s where the Zone Method comes in.
Instead of fighting against your open floor plan, the Zone Method helps you intentionally carve out functional areas. It’s not about closing the space off but defining it with purpose. Think of it as creating invisible rooms that flow into one another. When done right, each area feels like a private corner even in the middle of a massive room.
Over the years, I’ve seen homeowners transform chaotic lofts into serene sanctuaries using this exact strategy. You don’t need to be a professional designer or spend a fortune. You just need a clear plan. Let’s break down how you can apply the Zone Method to your own home, step by step.
For more foundational ideas on adapting your home’s layout, check out our guide on functional space planning.
What Is the Zone Method in Interior Design?
The Zone Method is a strategic approach to open floor plan zoning. Instead of treating the entire room as one blank canvas, you divide it into smaller “zones” based on activity. Each zone has a specific function, like lounging, dining, working, or playing.
These zones are defined using visual cues, not physical walls. You might use furniture placement, area rugs, lighting, or color to mark the boundaries. The key is that each zone feels intentional and connected to the others. A well-zoned room guides the eye naturally from one area to the next.
It’s a concept borrowed from landscape architecture, where outdoor spaces are divided into “rooms” for different uses. The same principle applies indoors. If you want to see how this works outside, explore garden design for ideas on creating outdoor zones.
Why Large Open Rooms Need Zoning
A big open room sounds dreamy, but without structure, it can feel overwhelming. You might end up with furniture pushed against the walls because the center feels like a no-man’s-land. That’s wasted square footage.
Zoning gives every square foot a purpose. It creates intimacy and defines the flow of your daily life. Your sofa tells you where to sit, and your rug tells you where the conversation area ends. Without zoning, the room lacks rhythm, and people tend to congregate awkwardly in the middle.
Moreover, proper zoning improves functionality. You can host a dinner party while someone reads in the corner, and neither feels disturbed. This is especially important in modern homes where multi-use spaces are the norm. A well-planned layout makes your home more livable and valuable.
Step 1: Identify Your Core Activities
Before you move a single piece of furniture, sit down and list every activity that will happen in your open room. Do you eat there? Watch TV? Work from home? Let the kids play? Each activity needs its own zone.
Be realistic. Don’t try to cram in ten zones if you only have six hundred square feet. A large room can handle 3 to 5 zones comfortably. Common zones include a living area, dining area, and entryway. If you have space, add a home office or a reading nook.
Prioritize the strongest activities. For example, if you cook daily and host often, the kitchen-adjacent dining zone should be large and easy to access. If you work from home, that zone needs good lighting and separation. Let your life dictate the zones, not the other way around.
For more inspiration on multi-purpose spaces, browse home design articles that tackle similar challenges.
Step 2: Use Rugs to Anchor Each Zone
Area rugs are the single most effective tool for room divider ideas without walls. A rug instantly creates a visual island. Place a large rug under your sofa and coffee table, and suddenly you have a defined living room within a larger space.
For the dining zone, use a rug that extends at least 24 inches beyond the edges of your table. This visually holds the dining set together. Avoid running the same rug across multiple zones—that blurs the boundaries. Each zone deserves its own rug, preferably with a different texture or pattern.
When choosing rugs, think about contrast. A high-pile rug in the living area and a flat-weave in the dining area adds tactile distinction. This subtle difference tells your brain they are two different rooms, even though the ceiling is continuous.
Step 3: Arrange Furniture Around a Focal Point
Every zone needs a focal point to anchor it. In the living zone, that might be a fireplace, a large piece of art, or a media console. In the dining zone, it’s usually the table. Arrange your furniture facing or surrounding that focal point.
Float your furniture away from the walls. In an open room, pushing everything against the perimeter makes the center feel like a dance floor. Instead, pull the sofa into the room and use a console table behind it as a zone divider. This creates a natural pathway behind the sofa.
Use the back of larger furniture pieces as “walls.” A high-backed sofa or a bookshelf can separate the living zone from the dining zone without blocking light. This is a classic trick used by professional interior designers to create functional space planning.
Step 4: Define Zones with Lighting
Lighting is an underrated zoning tool. Instead of relying on a single overhead light, use multiple light sources to define each area. A pendant light over the dining table instantly marks that zone. A floor lamp in the reading corner creates a cozy bubble.
Layer your lighting. Use ambient light to fill the whole room, task light for specific activities, and accent light to highlight architectural features. A dimmer switch gives you control over the mood. In the evening, you can dim the dining zone and brighten the living zone for movie night.
Consider the color temperature as well. Warm white light in the lounge area feels relaxing, while cooler light in a work zone boosts focus. This small detail reinforces the function of each zone without saying a word.
Step 5: Use Vertical Dividers for Major Separation
Sometimes a rug and furniture aren’t enough. If you want more privacy between areas, use vertical elements like open shelving, folding screens, or indoor plants. These are great room divider ideas that add character too.
A tall bookshelf that is open on both sides works as a partial wall. You can see through it, which preserves the open feel, but it visually severs the space. Fill it with plants, books, and decorative objects to make it a feature.
Indoor plants like fiddle leaf figs or tall bamboo create a natural green barrier. They soften the edges and improve air quality. For a temporary solution, try a folding screen or a sliding barn door. These work great in lofts where permanent walls are not an option.
If you are also planning your outdoor areas, learn more from outdoor living strategies that mirror these indoor zoning tactics.
Common Zoning Mistakes to Avoid
Even with good intentions, zoning can go wrong. One common mistake is making zones too small. People cram a tiny dining table into a corner, and it looks like an afterthought. Every zone needs breathing room. Measure your furniture and leave at least 36 inches of walkway between zones.
Another mistake is ignoring traffic flow. If people have to walk through the middle of your living zone to get to the kitchen, you have a problem. Arrange your furniture to create clear pathways. The walkways should feel natural, not like an obstacle course.
Finally, do not over-decorate each zone. Keep a consistent color palette throughout the whole room. If one zone is bold blue and the next is neon yellow, the room will feel chaotic. Use a common thread—like a shared accent color or material—to unite all the zones.
Zone Method Quick Reference Table
| Zone Type | Best Flooring Anchor | Focal Point | Lighting Strategy |
|---|---|---|---|
| Living / Lounge | Large wool rug | Media console or fireplace | Floor lamps + dimmable overhead |
| Dining | Flat-weave rug under table | Table or chandelier | Pendant light or chandelier |
| Home Office | Low-pile rug | Desk with task lamp | Desk lamp + natural daylight |
| Kids Play | Soft shag or playmat | Toy shelf or play tent | Bright, even ambient light |
Essential Tools for Implementing the Zone Method
- Area rugs: Different sizes and textures for each zone.
- Furniture with backs: Sofas, consoles, and bookshelves that double as dividers.
- Lighting fixtures: Pendants, floor lamps, and accent lights.
- Indoor plants: Tall plants like ficus or monstera for natural separation.
- Room screens: Folding or sliding panels for temporary privacy.
For a deep dive into principles that guide effective layout, refer to this resource on space planning. It offers additional strategies tailored to modern homes.
Frequently Asked Questions
Is the Zone Method only for large rooms?
No, you can use it in small rooms too. Even a studio apartment benefits from zoning the sleeping area from the living area. The principles scale down.
Can I zone a room without buying new furniture?
Absolutely. Just rearrange what you have. Use existing rugs, reposition your sofa, and add a table lamp to define a new area. It costs nothing.
How many zones should I create in a 500 sq ft open room?
Three zones is the sweet spot. Think living, dining, and a small entryway. More than three can feel cluttered.
What color scheme works best for zoned open rooms?
Use a neutral base for the whole room, then add one or two accent colors per zone. This keeps the space cohesive while allowing each area its own personality.
Do I need a professional to plan the zones?
Not at all. Start with a simple floor plan on paper. Move furniture around. Trust your eyes. If it feels right, it works.
Can I zone a room with a sloped ceiling?
Yes, use the low part for cozy zones like reading nooks and the tall part for active zones like dining. Work with the architecture.
How do I zone a room that also serves as a hallway?
Create a clear circulation path first. Use a runner rug to define the pathway, then place furniture zones on either side of that path.
What is the best room divider for rental apartments?
Folding screens, curtain panels, and freestanding bookshelves are renter-friendly. They don’t damage walls and can be moved easily.
Conclusion
The Zone Method turns the biggest challenge of open floor plans—the lack of walls—into your greatest design asset. By thinking in zones, you create a home that functions exactly the way you live. No more floating furniture or wasted corners.
Start by identifying your activities. Then grab a rug, reposition your sofa, and add a lamp. You’ll be amazed at how a few small changes can make a large room feel like a collection of cozy, purposeful spaces. For ongoing tips and inspiration, follow our blog for fresh ideas every week.