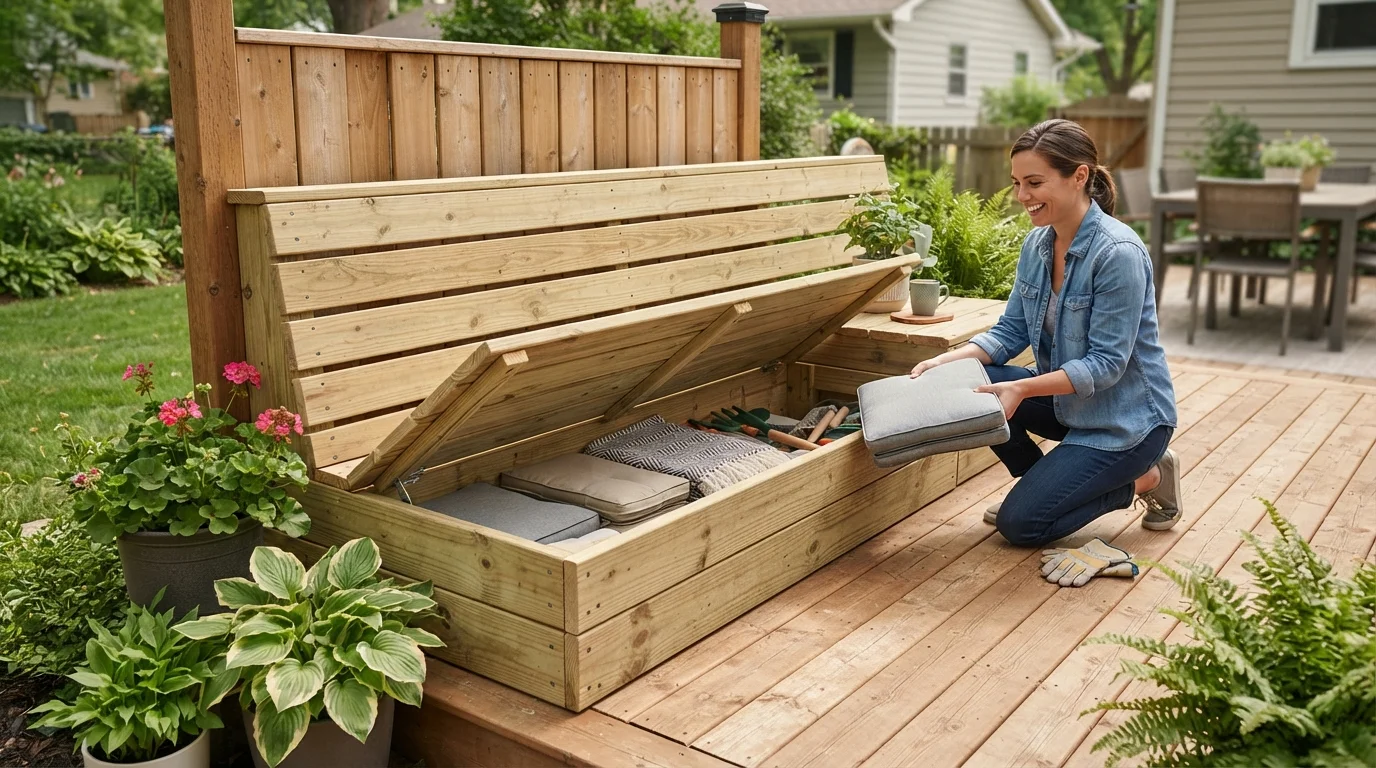
If your deck is crying out for more seating and you’re tired of tripping over garden tools, you’re in the right place. A deck bench with built-in storage solves both problems in one weekend. I’ve built dozens of these over the years, and this design is the sweet spot between simple construction and serious functionality.
You don’t need a full workshop or二十年 of carpentry experience. Just a few basic tools, some pressure-treated lumber, and a Saturday morning. Let’s dive into the plan that will give you a weather-resistant seat and a hidden stash for cushions, potting soil, or kids’ outdoor toys.
Why Build a Deck Bench with Built-In Storage?
A standalone bench looks nice, but it doesn’t pull its weight. When you add a hinged top and a deep cavity underneath, you transform dead space into usable square footage. Think about it: every time you sit down, you’re also organizing your outdoor life.
This style of built-in deck seating works especially well along railings or against the house wall. It keeps the walkway clear and gives you a permanent spot for entertaining. Plus, it’s significantly cheaper than buying a comparable storage bench from a big-box store — you’ll save around 40% on materials alone.
For more ideas on organizing your outdoor areas, check out our outdoor living projects section.
Tools and Materials You’ll Need
Here’s what I recommend for a bench that measures roughly 48 inches long, 18 inches deep, and 18 inches tall. Adjust the length to fit your deck’s dimensions.
| Material | Quantity | Notes |
|---|---|---|
| 2×4 pressure-treated lumber | 4 pieces (8 ft each) | For frame and legs |
| 2×6 pressure-treated lumber | 3 pieces (8 ft each) | For seat top and lid frame |
| 3/4-inch exterior-grade plywood | 1 sheet (4×8 ft) | For box sides and bottom |
| Deck screws (2.5-inch and 1.5-inch) | 1 box each | Galvanized or coated |
| Heavy-duty strap hinges | 2 pairs | Stainless steel recommended |
| Waterproof wood glue | 1 bottle | For extra joint strength |
| Exterior primer and paint or stain | As needed | UV-resistant finish |
Essential tools: Circular saw, drill/driver, tape measure, carpenter’s square, clamps, sandpaper (120 and 220 grit), safety glasses, and work gloves. A pocket hole jig is optional but helps for clean joints.
Step-by-Step Build Process
Step 1: Build the Storage Box Frame
Cut four 2×4 pieces to 45 inches long for the long sides of the frame. Cut four more pieces to 15 inches long for the short ends. Assemble a rectangle using 2.5-inch deck screws and wood glue at each corner. Make sure the frame is square — measure diagonally; both diagonals should be equal within 1/8 inch.
This box will sit directly on your deck boards, so you don’t need a bottom panel if your deck is solid. If you want to lift it off the ground, add 4-inch-long 2×4 blocks as feet at each corner.
Step 2: Attach the Plywood Sides
Cut the plywood sheet into two pieces: 45 inches by 15 inches for the front and back, and two pieces 15 inches by 15 inches for the ends. Attach them to the 2×4 frame using 1.5-inch screws every 6 inches along the edges. The plywood should sit flush with the top of the frame.
For a cleaner look, counter-sink the screw heads slightly and fill the holes with exterior wood filler before painting.
Step 3: Build the Seat Lid
This is the trickiest part. Cut five 2×6 boards to 48 inches long. Lay them side by side on a flat surface with a 1/8-inch gap between each board (use a spacer like a painter’s tool). Attach two 2×4 cleats across the underside — one 6 inches from each end — using 2.5-inch screws.
Flip the lid over. The result is a solid, handsome panel that will serve as both seat and storage access. For a more finished look, round over the edges with a router or sanding block.
Step 4: Install the Hinges and Attach the Lid
Position your two strap hinges 6 inches from each end of the box. Mark and pre-drill screw holes. Attach the hinges to the back edge of the box frame first. Then rest the lid on top, line it up with a 1/4-inch overhang on the front and sides, and screw the hinges into the lid.
Test the mechanism. The lid should lift smoothly and stay open without help. If it’s heavy — and it will be — install a gas strut or a fold-down support arm on one side to prevent pinched fingers.
Step 5: Sand, Prime, and Finish
Sand all surfaces with 120-grit, then 220-grit sandpaper. Wipe away dust with a damp cloth. Apply exterior-grade primer to all visible wood, especially the plywood edges that wick moisture easily. Follow with two coats of exterior paint or stain.
Choose a light color for the top if the bench sits in direct sun — dark surfaces get uncomfortably hot. I personally like a solid deck stain in a warm gray; it hides dirt and doesn’t peel like paint.
Pro Tips for a Long-Lasting Project
Here’s what I’ve learned from building these benches for clients over the years:
- Drill pilot holes for every screw near the ends of boards to prevent splitting.
- Use stainless steel fasteners — galvanized will eventually rust if you live near salt water or a pool.
- Add drainage by drilling six to eight 1/4-inch holes in the plywood bottom. This lets rainwater escape if the lid is left open.
- Include a handle on the front edge of the lid — a simple routed finger pull or a cup pull makes opening easy.
- Seal the interior with a clear waterproofing spray, even if you don’t paint the inside.
Thinking about your overall deck layout? Our space planning guide has great tips for arranging furniture around permanent features like storage benches.
Customization Ideas to Fit Your Space
A 48-inch bench is just a starting point. You can easily modify the design. For a corner bench, build two boxes at 45-degree mitered ends. For a deeper seat, extend the depth to 24 inches and use 2×8 boards for the lid.
Want integrated armrests? Add 2×4 uprights at each end and cap them with a 2×6 piece. That turns your storage bench into a small outdoor sofa.
If you’re also planning a garden refresh, browse our garden design inspiration for complementary planters and pathways.
Frequently Asked Questions
How much weight can this storage bench hold?
With the 2×4 frame and 3/4-inch plywood sides, the box itself supports about 300 pounds distributed evenly. The lid, if built with 2×6 boards, can handle two adults sitting comfortably — roughly 400 pounds total.
Do I need to treat the lumber before building?
Pressure-treated lumber arrives already protected against rot and insects. You still need to seal cut ends with a wood preservative — those raw surfaces are vulnerable. And always apply a topcoat of paint or stain for UV protection.
Can this bench stay outside all winter?
Yes, if properly finished. In snowy climates, slope the lid slightly (add a 1/8-inch shim under the front hinge side) so water runs off. Remove cushions and store them indoors during heavy snowfall.
How long does the project take?
Plan for about 4 to 6 hours if you have all materials pre-cut. Add another 2 hours for painting or staining, plus drying time. Most of my readers finish over a Saturday and Sunday.
What’s the best wood if I want a premium look?
Cedar is lighter, naturally rot-resistant, and takes stain beautifully. It costs about double the price of pressure-treated pine but is easier to work with and won’t warp as much over time.
Can I add a cushion on top?
Absolutely. Measure the lid and order a custom deep-seat cushion with waterproof fabric. Just remember that the cushion will need to be removed to open the storage. A 4-inch thick cushion with a zipper cover works best.
Is this bench design safe for kids?
Yes, assuming you round over all sharp corners and screw the box to the deck using L-brackets (this prevents tipping). Also install a slow-close hinge or a support arm so the lid doesn’t slam down on little fingers.
For more complete project planning, you might enjoy our blog articles on DIY outdoor builds.
Conclusion
Building a deck bench with built-in storage is one of the most rewarding projects you can tackle. It gives you a place to sit, a place to stash gear, and a serious boost in curb appeal — all for under $100 in materials. The beauty of this design is its simplicity. You don’t need complex joinery or special tools. Just careful measuring, straight cuts, and a willingness to enjoy the process.
Once your bench is in place, you’ll wonder how you ever lived without it. For more outdoor project ideas, keep exploring the home design section — there’s always something new to build.